Pool of Tears: Trying to Understand Keyboard Switches
Or, why even after trying hundreds of switches, I still use Cherry MX Browns.
Curiouser and curioser, you thought as you scrolled deeper into the cesspit of misinformation. Thocky, creamy, clacky, poppy, marbly. Long pole, frankenswitch, dual rail. L+F+SS. Before you knew it, the switches were described using more made up words than the Jabberwock. However, unlike the Jabberwock, keyboard switches are of course real.
So let’s start at the beginning – the mechanism switches use.
Switching mechanisms
First let’s recall the definition of a switch, from my previous post:
it is the contact mechanism that completes a circuit when it is pressed, allowing the PCB to detect keypresses.
This is true for mechanical switches. But the meaning of the word switch has evolved to cover non-contact-based mechanisms, and is often also used to refer to analog input mechanisms.
There are many mechanisms used by “enthusiast” keyboards – mechanical, electro-capacitive, optical, and magnetic. The two of note are mechanical and magnetic. The two worth your time are mechanical and electro-capacitive.
Mechanical switches themselves have many types – Cherry MX, Alps, Omron, Low Profile etc. Magnetic switches use a few different technologies – magnetic reed, hall effect, TMR, and inductive sensing. Electro-capacitive switches are dominated by Topre, but companies like Niz, Varmilo, and AEBoards have also made them.
Given that Cherry MX style keyboard switches are the most popular, and the hobby truly exploded after Cherry’s patent on switches expired allowing Chinese companies to mass manufacture compatible switches, we will concern ourselves primarily with Cherry MX style switches in this article.
For the sake of completeness, a brief overview of other types of switches appears in the appendix.
The Anatomy of the Cherry MX switch
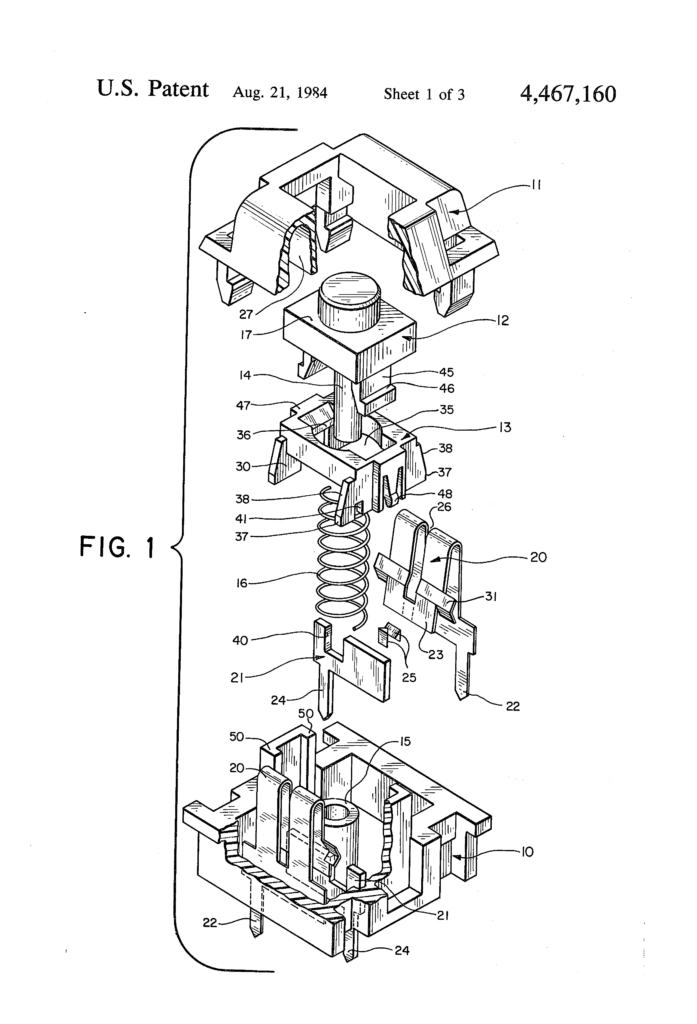
The brilliance of the Cherry MX switch lies in its simplicity. The Cherry MX switch consists of 5 parts:
- The top housing
- The stem
- The spring
- The contact leaf
- The bottom housing
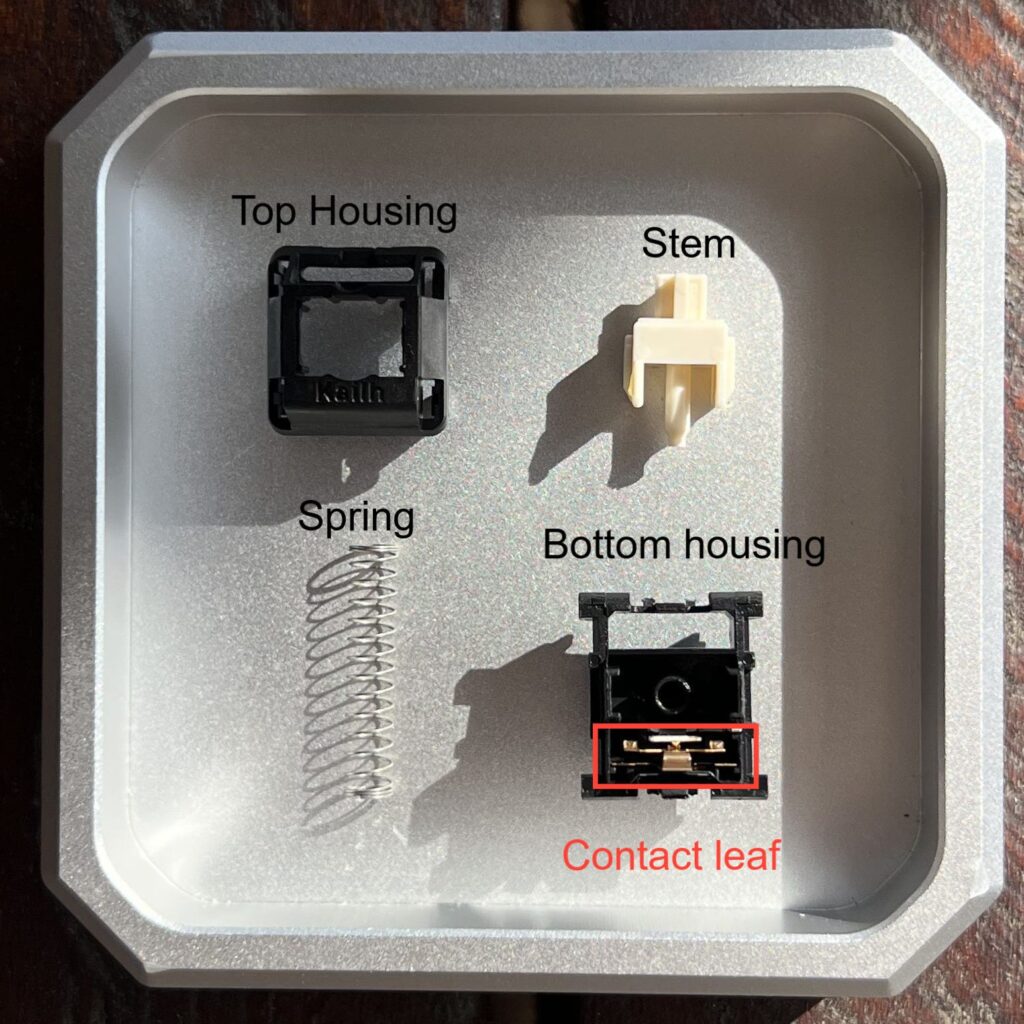
Cropped and annotated version of photo by Donut Keebs.
This is in comparison to the 8 in the IBM Beam Spring switch, or Alps designs with even more parts.
The housing contains the stem, spring, and contact leaf. The stem pushes the contact leaf as you press down on it, and the spring provides an automatic rebound. The top and the bottom housings have the right cutouts to let the contact leaf, spring, and stem to fit, move and function. The original patent is quite instructive of the design details that make it work. I shall just reproduce the diagram here:
Breaking down each part we have:
The Top Housing
The top housing of the switch – it holds the stem in place and latches on to the bottom housing. From a consumer perspective, the most relevant points of the top housing is the LED slot. You can have
- A thin slit which just let the legs of THT diodes through (largely used by old Cherry switches, not in vogue anymore)
- complete hole letting light from SMD LEDs through,
- a lens in the top housing for SMD LEDs
- or a separate diffuser.
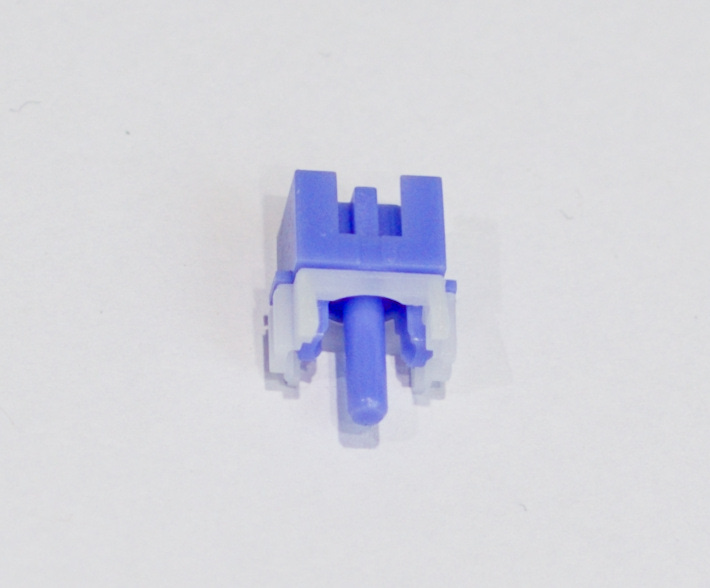
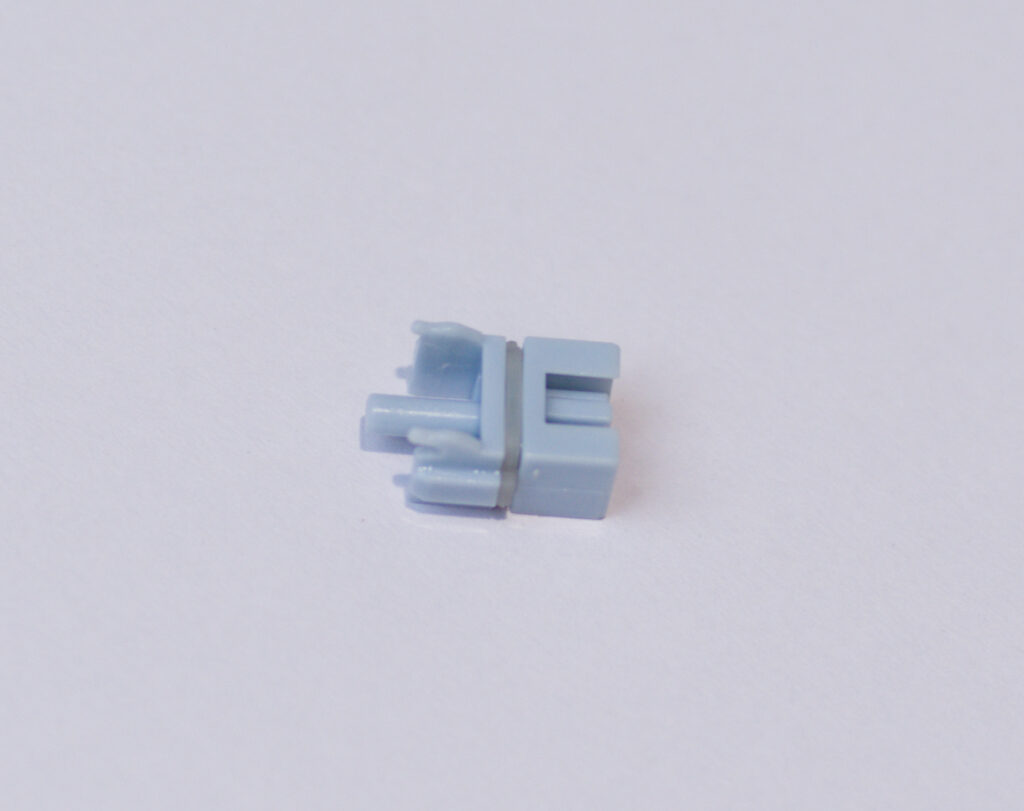
The Stem
The fun part – determines the feel and sound of the switch. The stem is crucial in determining if a switch is linear, tactile, or clicky. A linear stem will have straight legs, a tactile stem will have curved legs, and a clicky stem incorporates either a click jacket, or an additional protrusion to bump a clickbar, or a dedicated click leaf to produce clicks.
Silent switches usually incorporate dampeners in the stem, to reduce the top and bottom out sound.
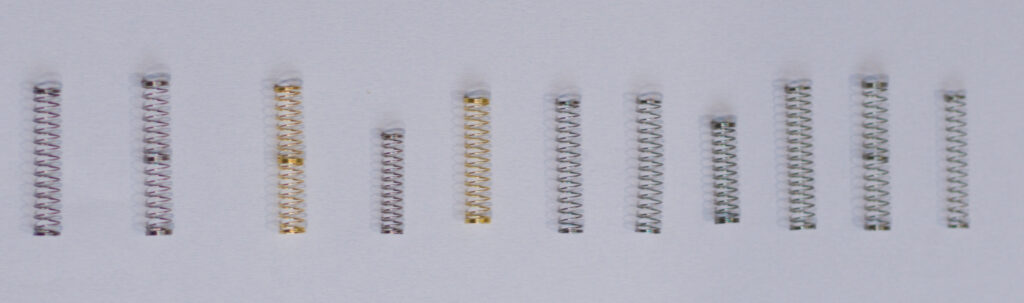
The Spring
Determines how heavy or light the keypress feels.
The two things which matter the most are the spring length, and the spring weight. The spring weight determines how much force it will take for the switch to bottom out. The length of a spring determines how compressed the spring already is when the switch is at the top out position. This leads to the switch requiring more force at the top out of the stroke, but also leads to a gentler slope than a shorter spring.
Aside: Progressive Springs
You may have come across “progressive” springs, which claim to offer different force curves along different points of keyboard travel. Progressive springs work by varying the pitch of the spring along its length. These have their origin in vehicle suspensions, where they provide better cushioning against shocks. But these are a placebo at best in the context of keyboards.
When you compress a spring, the entire spring gets compressed at once. And only when spring in the closely wound sections start touching each other does the force it takes to compress the spring further change. So in practice it means that you need significant variations in the coil rate for there to be a difference. Since switch springs are short, are pre-compressed inside the body of the switch, and have short pitches, progressive springs make no discernible difference.
This YouTube video demonstrates an automotive progressive springs getting compressed, and this one demonstrates an automotive progressive spring being tested. Note how the large changes in pitch lead to- smaller increases in spring rate, and how the force-travel graph still remains close to linear. Of course, automotive springs tend to be 200mm+, while switch springs have lengths of 14mm-22mm. And unlike automotive springs, switch springs are pre-compressed, leading to the tightest coils already being bound before travel starts. So the difference is even less apparent with switches.
The other point of concern with springs is spring ping. If the spring starts vibrating in the housing, it can produce an unpleasant pinging sound. This can either be caused by the spring resonating at the frequencies generated by the keypress, or due to the spring being placed loose inside the housing, or the spring not setting into the stem properly, which allows the top and bottom to jump around. This can usually (but not always) be fixed by lubricating the spring with grease or with oil. If lubrication doesn’t help, you may need to swap springs. However, if the issue is caused due to poor switch molding, better springs may not be enough to compensate.
The contact leaf
The contact mechanism of the switch. The legs of the stem press against the switch as you move the stem, causing the two halves to touch and complete a circuit. The leaf is also important in providing the tactility to the switch. The stiffness of the switch, and its angle contribute to the tactile feedback you get from it.
The bottom housing
Holds the entire switch assembly in place. The contact leaf is inserted into this. This has rails for the stem, and also is molded so that the top house can latch into it.
Switch categorization
Switches can broadly be categorized into three types, based on the type of feedback they provide -linear, tactile, and clicky.
Linear switches
These switches provide a keystroke where the distance traveled is directly proportional to the force needed. Examples include Cherry MX Red, Cherry MX Black, Gateron Yellow, and Akko Creamy Yellow.
Tactile switches
These switches provide an increase in force followed by a decrease in force along the key travel, i.e. a “bump”. Examples include Cherry MX Brown, Akko Creamy Blues, and Gateron Baby Kangaroos. This bump is provided by the interaction of the legs on stem and the contact leaf.
Clicky switches
In addition to the tactile bump, they provide an audible click in the middle of the keystroke. Examples include Cherry MX Blues, Kailh Box White, Cherry MX Greens. Cherry implemented the click using a click jacket, a portion of the stem which snaps down when pressed, producing an audible click.
Silent Switches
These can either be linear or tactile, but have padding to dampen the top out and bottom out sound of the switch. Examples include Cherry MX Silent Red, Akko Fairy Silent Switches, and TTC Bluish whites.
The implementation of the dampeners affects how mushy a switch feels.
Aside: Red/Brown/Blue switches
You will sometimes see switches referred to as Red, Brown and Blue, for Linear, Tactile and Clicky respectively. This nomenclature came around because Cherry’s most popular linear, tactile, and clicky switches were Cherry MX Reds, Cherry MX Browns, and Cherry MX Blues respectively. And the Chinese OEM versions continued to use this colour scheme for their own switches.
However, there is no correspondence between the colour and the type of switch anymore. For example, you have the Gateron Sea Salt switches which are blue coloured, but linear. The Akko Creamy Blues are tactile, and the Cherry MX Blues continue to be clicky.
3-pin vs 5-pin switches
This refers to the number of pins a switch has. A 3-pin switch has 2 metal pins, and one plastic pin in the middle. 5-pin switches have 2 additional plastic pins on either side of the switch. The main advantage of 5-pin switches is that they can be used in plateless keyboard builds, and that the switches are more stable if you are using a soft plate like polycarbonate.
You can modify a 5-pin switch to be a 3-pin switch by cutting the two extra plastic pins off.
Aside: 3-pin hotswap compatibility
Most switches following the Cherry MX footprint are intercompatible with hotswap sockets following the Cherry MX footprint. However, some manufacturers, notably Redragon, go for thin sleeve style hotswap sockets. These work with switches with thin metal pins such as the Outemu OEM switches, but will fail if the switch has standard thickness pins (most non-Outemu switches).
Tolerances and Wobble
You may have come across people talking about tolerances when reviewing switches. Tolerance, in the context of engineering, refers to how much deviation from the standard is allowed. However, the term is used much more loosely when taking about keyboards. Tolerance is also often used to describe how tight or loose fits are when talking about keyboards. So even when something is engineered to be loose, and the entire production run is consistent, keyboard hobbyists may talk about “poor tolerances”.
Stem and Housing Wobble
When the top and bottom housing, and the stem are placed together, the top and bottom housing do not lock perfectly together and have some give. This means that the top housing can wobble in place a bit. Similarly, the relative geometries of the stem and housing can cause the the stem to wobble along the X-Y axes along with its usual path along the Z axis.
Why you actually want some give
Switches are designed with some amount of give in mind, and do not sit perfectly tightly together by design. This is because of tolerances (in the engineering sense), and because the real world is not a simulation. As the injection molds are used again and again, they degrade bit by bit, and often not evenly. To allow for this, switches are designed with some give in mind.
Extremely tight housings or stems can cause the switch to bind in the case of even the slightest of misalignment, and can cause the switch to stick if you press it off center.
This is further compounded by the fact that different manufacturers make different parts, and they need to be interoperable. If a switch has less give, it can lead to binding with warped keycaps, as the stem scrapes the housing. Varying thickness of the housing/keycap stem can also play a similar role, as has been noted in the case of GMK keycaps binding with retooled Cherry switches.
We have also seen this phenomenon with Staebies, where they fail to work with warped/poorly molded keycaps, even though looser stabilizers work in that case.
However, excess wobble can indeed lead to a poor typing experience, which is why people often end up filming switches.
Tolerances on springs
This is one instance where the standard definition of tolerance meshes with how keyboardists use the word.
Springs come rated with tolerances e.g. +/-5g or +/-10g or +/-15g. In theory this means that there can be a 10g/20g/30g variation between the weights of different pieces of the same switch model. However, in practice the difference is not significant within a single batch. The weight differences are barely perceptible, with inconsistent factory lubing causing more apparent differences than the spring itself.
Inter-batch variation can be more significant, however I am yet to come across batch spring differences that made them unusable. My suspicion is that wide tolerances are a CYA move. Though yes, different people may have different sensitivities to the weight differences. Companies sell 3rd party springs which have tighter tolerances than the springs that come pre-installed.
Cherry MX Compatible switches that break the mold
Following the expiry of Cherry’s patent, Chinese factories have produced imitations wholesale. However, they have not settled for simply copying the designs. Many factories have produced refinements, revisions, and improvements, that are drop-in replacements for Cherry MX switches.
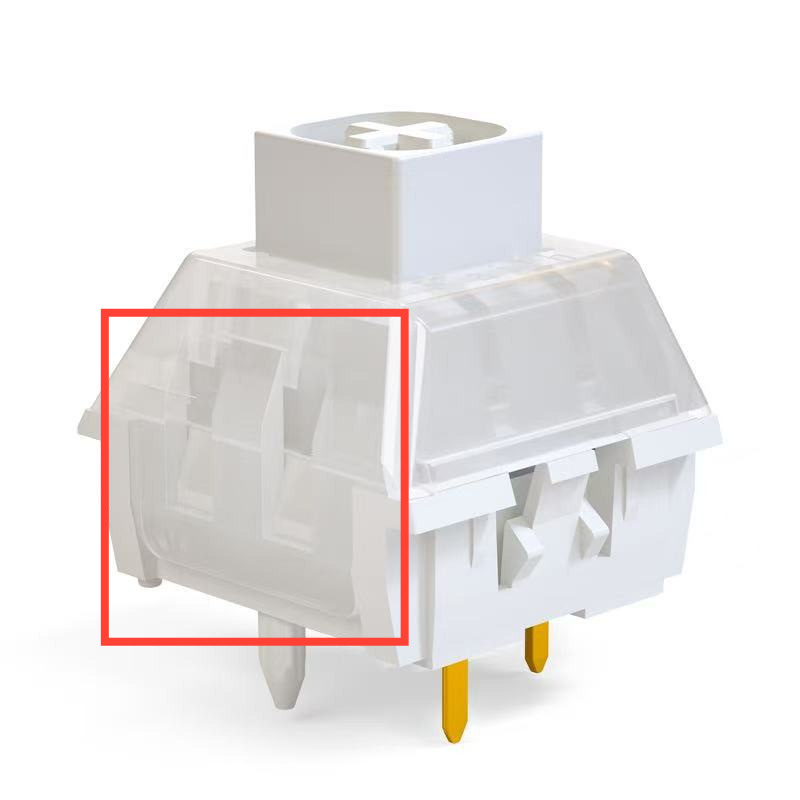
Winglatch
Instead using 4 legs to join the top and bottom housing, they are joined using a wing latch. This is more secure than the traditional 4 legs approach, so it reduces the degree of top housing wobble. But this also means that it is slightly harder to open than 4-legged latch switches.
Kailh Box Switches
Uses a box structure (with wing latches) that provides better dust-proofing.
Dust proof stems
These stems have a boxlike shape around the keycap mount (+) to reduce dust ingress. This is not to be confused with Kailh’s box structure, where the entire stem, not just the keycap mount is different.
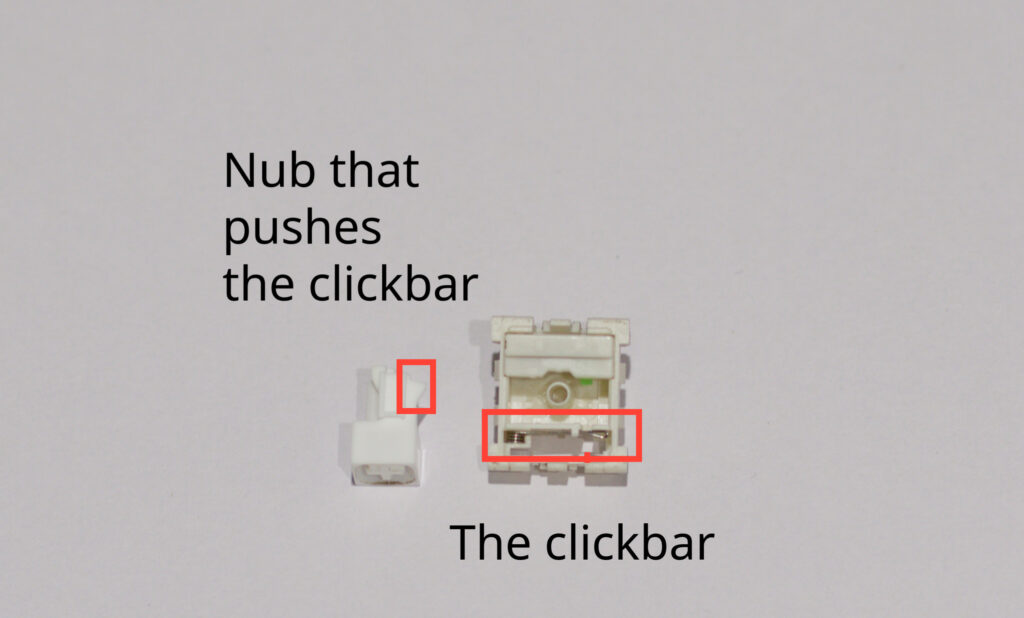
Kailh Clickbar
The bottom housing is modified to have a clickbar. Stem has 2 legs, one for the leaf, one for the clickbar. The clickbar consists of a torsion spring with an extra long leg that is pushed by a nub on the stem, causing it to snap and produce the clicking sound.
Plus side is that the clicks are a lot more crisp. Downside is that the click doesn’t correspond to actuation anymore, and there are two clicks each keypress – one on the upstroke, and one on the downstroke.
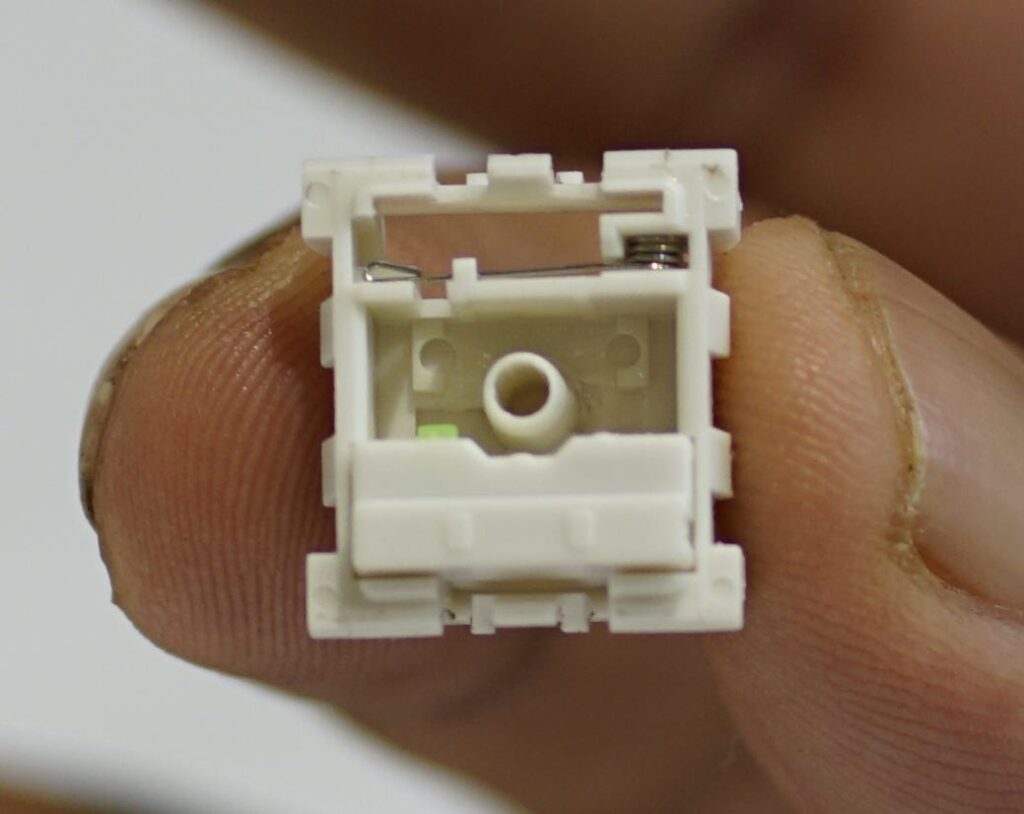
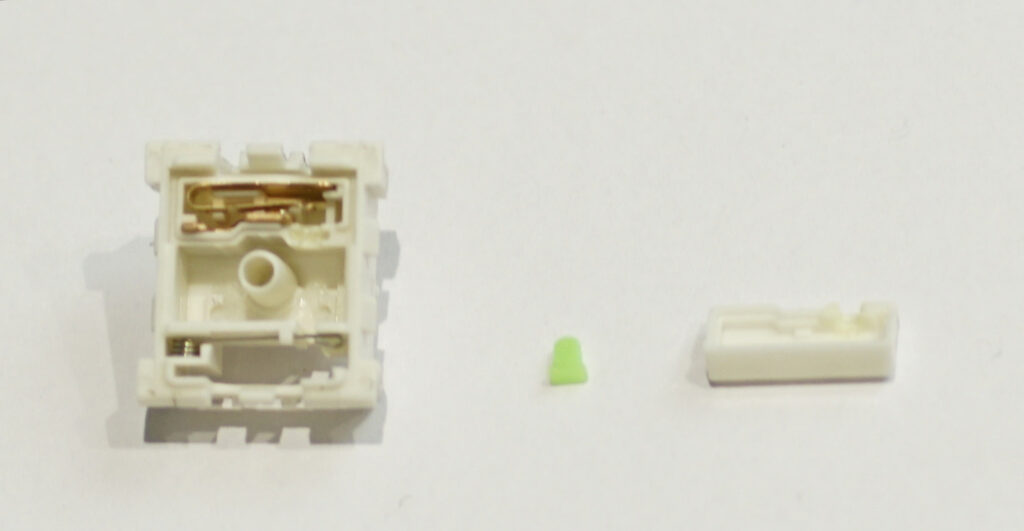
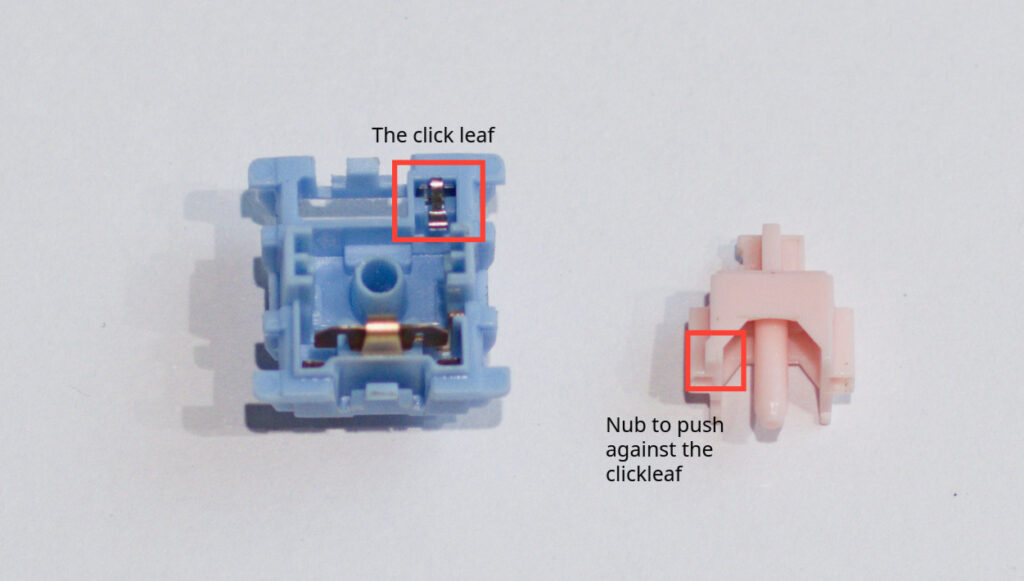
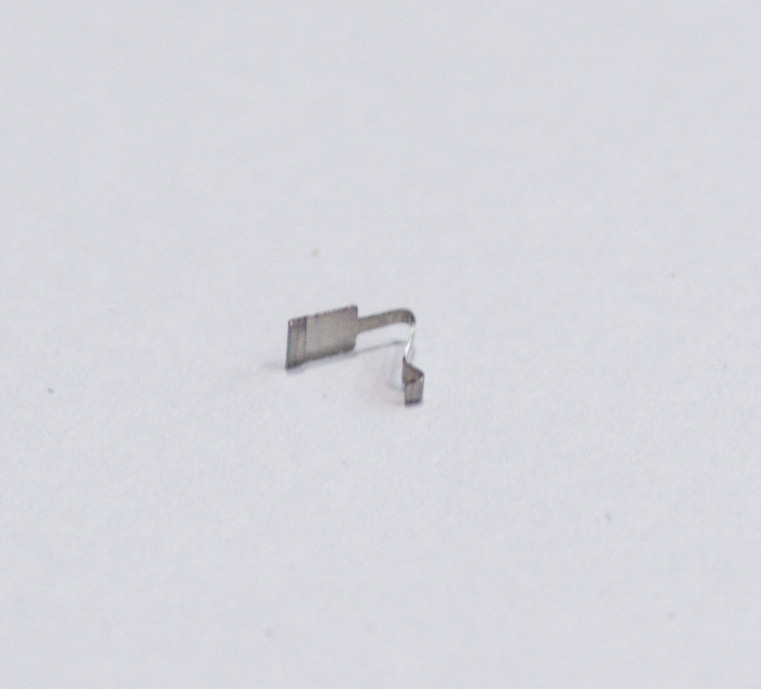
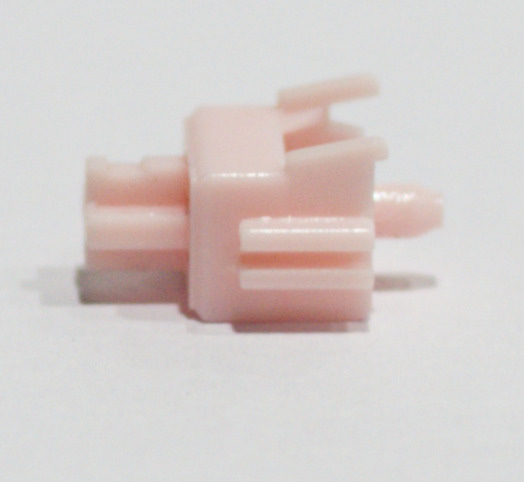
Click Leaf
Some MX-like switches have also incorporated ALPS like click-leafs, examples include the Gateron Melodics and the ZealPC Clickiez. These rely on an additional metal leaf that buckles when the stem is pressed, adding tactility and providing a crisp sound that click jackets don’t provide.
TTC Lego structure
The switch stem is broken into multiple parts, which allows for nice visual effects like embedding a heart (like in the TTC Honey Hearts) or providing a multi-colour stem. It may be possible to combine switch stem parts in theory, but since very few lego structure switches have been released this is not a matter of practical consideration.
Gateron Dual Rail
Instead of one rail, the switch housing and stem have two rails. This provides increased stability/decreased stem wobble.
Tecsee Medium Switch
Switches which use the Cherry MX footprint, but have a lower height. An attempt at a middle ground between classic full height switches, and low profile switches which break the Cherry MX foot print. Which also has not seen much adoption.
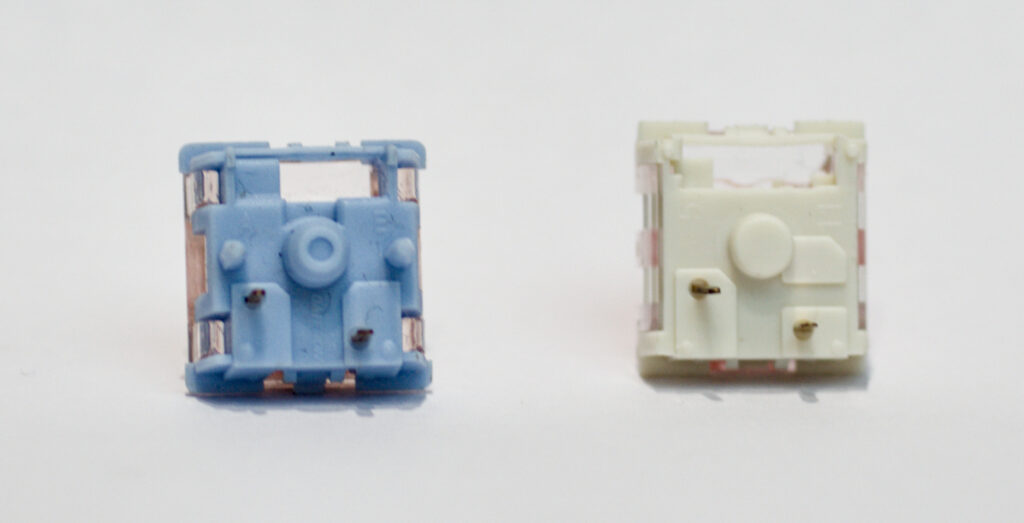
Slopes for north facing LEDs
These switches solve the issue of north-facing interference, by having a steeper slope in the top housing.
Long pole switches
Some switch stems have longer poles than others, which leads to them being called “long pole”. A longer stem pole leads to a shorter travel distance. But perhaps more significantly, it affects how the bottom out feels.
Cherry switches usually bottom out on the rail, that is to say, the rail of the stem touches the bottom of the guide first, before the pole touches the bottom of the housing. Long pole switches invert this, and the pole touches the bottom of the housing before the rail. This bottom out is harsher, and typically produces a higher pitched sound.

Travel distances
The two travel distances you will see mentioned are
- Pre-travel – the amount the stem has to travel before the contact leaf closes, completing a circuit, and leading to input.
- Total travel – how far the stem can travel at most, before it bottoms out.
In the good old days, switches at 2mm of pre-travel, and 4mm of total travel. However, this is no longer the case. Many “fast” switches have less travel. These have historically been colour-coded silver. The claim is that faster input gives you an advantage in gaming. However, the flip-side of this is that it is easier to misinput when you are using them. Which can lead you to go from grazing to getting hit by bullets, or break your comobs.
Long pole switches in a standard body lead to reduced total travel, but that is not the only way reduced travel can be achieved. Reducing the height of the switches itself, or reducing the length of the rail can also reduce the total travel.
Aside: Low Profile Mechanical Switches
There are a number of low profile keyboard switches, all fundamentally based on Cherry’s design. Unfortunately they are not inter-compatible. Kailh, Gateron, and Cherry all use different footprints. So it is not possible to drop in a switch from one manufacturer in place of another. This Reddit post shows the differences quite well.
Common modifications to switches
Lubing switches
Lubricating switches reduces friction, and mutes the sound. Switches often come factory lubed, however the quality of the factory lubrication varies. Choosing to (re)lubricate the switches is the first sign you have gone off the deep end. And also the part of the hobby most likely to make you cry, because of how dreadfully boring it is. Though those more patient than me may argue that there is a certain Zen quality to the process.
However, I will argue that in 2025, factory lubrication (especially from quality brands like Gateron or HMX) is good enough, and hand lubrication is not mandatory.
The most common choices for lubricating switches are made by Krytox. The usual recommendations are using Krytox 205g0 for lubricating the stems and housings of linear switches, and Krytox 203g0 for tactile switches. However this is not a hard and fast rule. Krytox is preferred because of its longevity, because it is plastic safe, and because it is less prone to separating (as long as it is being worked). However, there are other lubricants which work well, such as RO-59 tm KT, Molykote EM30L (thinned with an appropriate base oil) and SuperLube PTFE greases.
Note: g0 here refers to the NLGI Grade of zero, which measures the consistency of the lubricant.
These options often offer lower price tags than Krytox, however, they have not been adopted as much. RO-59 tm KT is a dry film lubricant, so you need to mix it with distilled de-ionized water, apply it, and wait for the lube to dry. Molykote EM30L and Super Lube need to be mixed with oil, and may be prone to separation down the line. However, in practical terms, these are not major issues for keyboards (especially if you will be using them daily). The reason Krytox reigns supreme is due to its brand name, and its ease of availability and use.
Springs are usually lubricated with oils, largely to reduce spring ping as mentioned earlier, though they may also be lubed with grease.
For a specific guide on lubricating switches, check out the guide by Alexotos.
While there are a number of lubricants which can be used, many common lubricants like WD-40 and Petroleum Jelly (e.g. Vaseline) are not recommended (even if you can thin them) because they can corrode plastic.
Filming
Refers to adding a thin layer (called a ‘film’) between the top and bottom housing. This is usually done to make the top housing fit more closely with the bottom housing, reducing wobble and making the keypress feel more consistent.
This used to be a major issue in the bad old days, especially with cheap switches, however the molding quality has increased significantly, and this is less necessary.
Spring swapping
Do you like everything about the switch, but want it to be lighter or heavier? You want the same bottom out weight, but a heavier start? Did lubing not eliminate spring ping?
You can just replace the spring. Companies like Sprit, TX and Durock make springs for this express purpose. This step is usually done at the same time as lubing.
L/F/SS when used to describe switches refers to these three common modifications respectively.
Frankenswitches
As the name suggests, switches made by Frankensteining parts from different switches into a single switch. Frankenswitches have sometimes paved the path for switch styles that later became mainstream. Most famously the Holy Panda, and its countless imitators. If you are interested in reading about frankenswitces in more depth, I recommend this writeup by Aidan Smith.
Breaking in switches
Technically not a mod, but I didn’t want to create a new section for this. As a switch is used, the way it feels will change over time. The two main reasons this happen is
- Friction – As the stem rubs against the housing repeatedly, both parts are smoothed out. This happens faster with unlubed switches, and takes longer with pre-lubed switches.
- Lube redistribution – As you press a switch up and down, the lube gets worked through and distributes more evenly across the switch.
You can buy machine broken-in switches, but a machine precisely pushing a switch up and down does not replicate a human typing. Humans press switches at varying angles and with varying forces in the exact same way a linear actuator doesn’t. Further, different switches require differing numbers of actuations to be broken in. The best way to break switches in is to continue to use them, until the feel stops changing.
Force curves
Just about the only objective part about keyboard switches. Force curves plot the relationship between the force applied to the stem, and the displacement of the switch stem. That is to say, they show how much effort it takes to push a switch a certain distance. This is a straight line for linears (in theory, real life has to deal with friction), and only the starting point and gradient matters. For tactile switches, they also demonstrate the tactile bump.
However, these do not tell the full story. A force curve does not reflect how scratchy a switch is, it does not measure switch wobble, how consistent the switches are, and it does not reflect the sound of the switch.


Switch sounds
The sound of a switch. The least important aspect from an operational perspective, and yet the most important aspect from a marketing perspective. Much has been said about the sound of switches on the internet. But in general, it doesn’t make sense to talk about the sound of the switch in isolation. Talking about the sound of a switch makes about as much sense as talking about the sound a guitar string makes. Do they have their own characteristic sound? Yes. Does the body it is used with make a much larger difference? Also yes.
The geometry of the switch, and the materials used in the switch both affect sound. The force of the spring affects the sound, because it affects how hard you bottom out the switch, and how hard the top out is. The specific plastic used, and the specific grade/blend/hardness of said plastic affects the sound. It is not at all surprising then why two all Nylon switches may end up sounding completely different.
And if you are listening to the sound on YouTube or Instagram, the recording and playback setup makes a significant difference. Of course, as bad as sound test videos are at conveying sound, text is worse.
The best way to understand the sound of a switch is to try them in person, after placing them in a keyboard.

Choosing your switch
So, in practical terms, which switch is best for you is a matter of preference. There are a lot of articles which will tell you that X switch is best for gaming, Y switch is best for typing, Z switch is best for coding etc. But this does not hold true. The best way to figure out if a switch is good for you or not is to try typing on it. Which unfortunately can be impractical as the custom keyboard business is mostly online, with only few places which allow you to walk in and try different switches.
The second-best option is to get 5-10 switches, mount them on the keyboard, and type on them. The third best option is getting a tester pack with one of many different switches.
But there are some practical considerations that can narrow the field a bit, if you are coming in blind.
- Where will you use it – If you are using a keyboard switch in a shared workspace, or otherwise some place where your keyboard cannot be too loud, you are better off avoiding clicky switches.
- The weight range of the switch – Most of our switch sales are centered around an actuation force of 40gf-50gf. Chances are that a switch with a weight in that range will work for you as well. If you rest your fingers heavily on the keyboard, then you would likely prefer a heavier switch, and vice versa.
- actuation distance – switches with a high actuation point (~1.2mm, usually found in Speed Silvers and the like) are more prone to accidental activation. Especially if you rest your fingers heavily on the switch.
- Factory lubrication – If you are just starting out, you want a switch that is already factory lubed. So that you can get started using the switch right away.
- Your budget – Self-explanatory. However, even if you have a large budget, I would suggest starting with cheaper switches first, so that you get a feel for what you like and what you don’t, before you spend money on expensive variants.
To answer the subtitle – I like Cherry MX Browns because they work well for me. Enough tactility that it prevents misinputs (especially when pressing keys away from the center with my little finger). But not so tactile that it is intrusive. The bump is small enough that the tactility disappears when I am in the zone, typing fast.
Appendix
North Facing Interference
North facing interference is a phenomenon where the top housing of a Cherry MX switch ends up touching/interfering with Cherry profile keycaps. This can happen when the switch is placed in the north facing direction (i.e. the LED at the top of the footprint). Far more likely in the home row, and with thick or scooped keys.
Topre, Magnetic, and Optical switches
Magnetic switches
These switches have a tiny magent embedded in them, and rely on different sensing mechanisms, primarily Hall Effect and TMR. Popularized by Wooting.
The main advantage these offer over mechanical switches is analog input, and the ability to hotswap without relying on Kailh style hotswap sockets.
Features like SOCD cleaning and multiple actions on key presses (e.g. quick loot) are often marketed as features of magnetic keyboards, but this can be done with digital input as well.
Magnetic reed switches use a reed with two strips in it which connect when exposed to a magnetic field. This provides digital input. This type of switch is mostly not used for keyboards anymore, but is an interesting note in history.
Inductive switches instead rely on electromagnetic induction, like in the Ducky One X. These switches are not interchangeable with Hall Effect and TMR switches.
Magnetic switches have the key disadvantage that even if the footprint is the same, it is not guaranteed that a switch that will work in one keyboard will work in another. The polarity of the magnet, and the magnetic flux density determines compatibility. There are multiple standards on the market, such as Monsgeek using S facing magnets, Wooting Lekker using N facing magnets with 102Gs to 905Gs Magentic Flux, Gateron Magnetic Jade having 120Gs to 700Gs Magnetic flux, Outemu with 80Gs to 2000Gs magnetic flux etc. All of these are non-intercompatible. Keyboards which support multiple fluxes need to have a hall effect sensor that is sensitive at a wider range, and also need the firmware to specifically support each individual flux range.
Note: The magnetic flux density here refers to the magnetic flux density at the sensor, not of the magnet itself. As you move the magnet up and down, the sensor is exposed to increasing flux.
Topre/EC Switches
These rely on the electro-capacitive effect to sense key presses. Most implementations consist of a rubber dome with a conical spring inside. These provide incredible tactile feedback, where you have resistance until the inflection point, after which the rubber dome collapses. The rubber dome also springs back easily once you let go.
Unfortunately, these have seen limited adoption, largely because of cost barriers. There is a very limited production of EC style switches, and the best way to get them is to buy a Realforce and harvest them. The production of non-topre EC switches suffers from the lack of economies of scale, so prices remain high. EC switches are expensive, so fewer people will buy it, so EC switches are expensive.
Optical switches
The stem of an optical switch has slit, though which a beam of light passes through. The slit is wider at the top and narrower at the bottom. So the amount of light passing through can be used do determine how far the key is pressed.
Other mechanical switches
There is a long history of keyboard switches before Cherry MX style switches came about. IBM’s Beam Spring and Buckling Spring, Alps switches, also weirder options like the Hi-Tek switches. The history is much too long to cover in an appendix, so I suggest going through the timeline on Deskthority Wiki Mirror for an overview of how switches evolved.
This post also appeared in my Substack.